How to do a squat: a complete guide to technique
Stance, depth, knee tracking, bracing, common faults; back squat vs. front squat
The squat is a fundamental exercise for building lower body strength and muscle mass, whose effectiveness and safety depend on perfect technique.
📌 3 Key Takeaways
- Core bracing is the foundation for a safe and powerful squat, not just "tightening the abs"; the goal is to create intra-abdominal pressure for maximum spinal protection.
- Squat depth and knee tracking outward are critical for activating the glutes and protecting the knee joints from excessive load.
- The choice between a back or front squat depends on your individual goals, mobility, and comfort, with each variation loading the muscles differently.
Why is the Squat the "King of Exercises"?
💬 Simply Put: The squat is a key full-body exercise that builds strength and muscle, but requires perfect technique for effectiveness and safety.
The squat is called the "king" for a reason. It's a complex, multi-joint movement that engages hundreds of muscles in your body simultaneously. The primary focus is on the lower body: quadriceps, glutes, hamstrings, and adductors. But to perform a single repetition, you also mobilize your entire core, the back muscles that stabilize your spine, and even your shoulders and arms holding the barbell. This massive muscle activation leads to greater metabolic stress and a stronger hormonal response (increased testosterone and growth hormone levels), which is a catalyst for whole-body muscle growth.
Beyond aesthetics and strength, the squat is a fundamental human movement. We squat every day to sit down, pick things up off the ground, or play with our children. Training this movement with weight directly improves your quality of life. Systematic and correct squat execution builds strong bones, strengthens the connective tissue around the knees and hips, and significantly improves balance and coordination. I often see people in the gym avoiding the squat for fear of injury, but the irony is that a properly executed squat is one of the best preventative exercises against everyday injuries.
Preparing for the Squat: Stance and Bar Grip
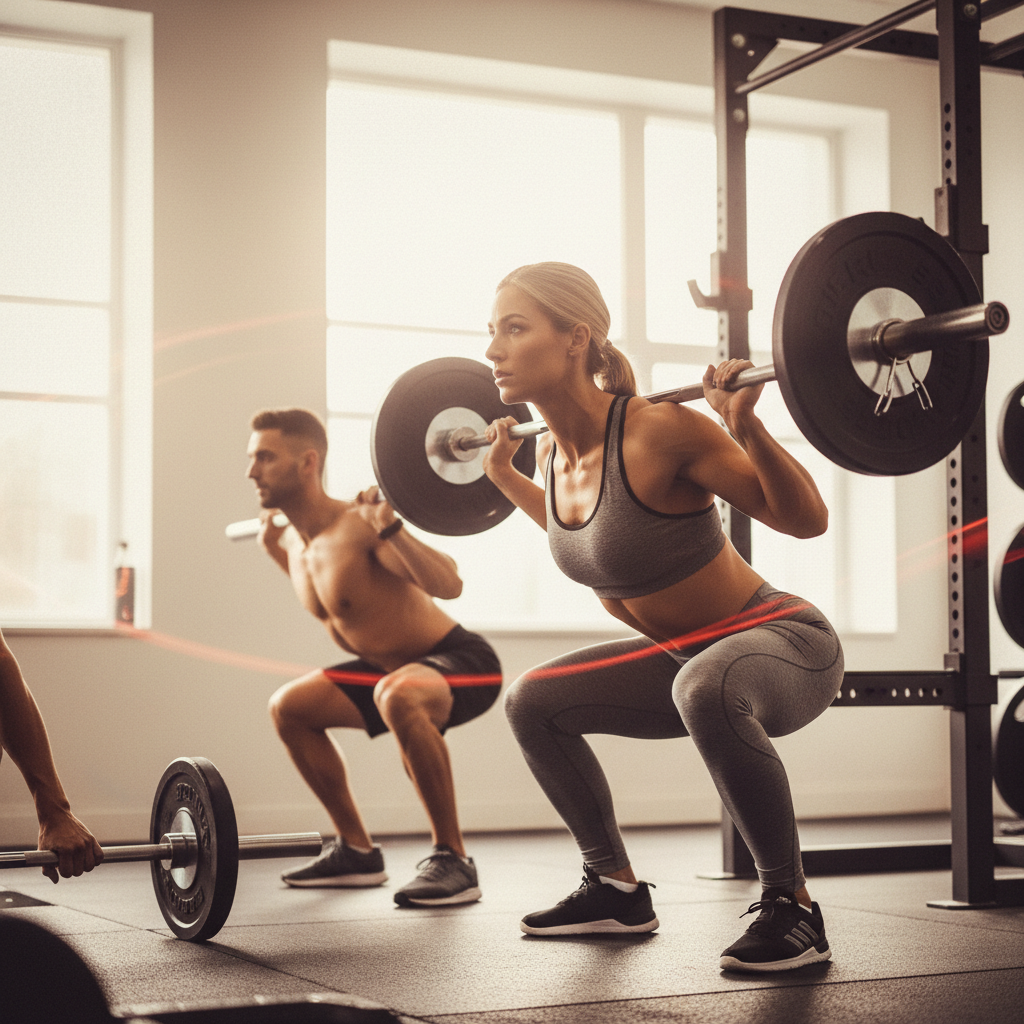
The perfect squat starts before you even unrack the barbell. The first step is finding your optimal foot stance. For most people, this means feet placed slightly wider than hip or shoulder-width apart, with toes pointing slightly outward (between 15 and 30 degrees). This stance allows for easier depth attainment, creating space for the hips to move between the thighs. Too narrow a stance often limits depth and can strain the lower back, while too wide (sumo) a stance shifts the focus to the adductors and glutes but can be uncomfortable for some.
The next element is the grip and the position of the barbell on your back (for back squats). There are two main variations. High-bar position: the barbell rests directly on the trapezius muscles. This allows for a more upright torso during the movement and emphasizes the quads more. This is the position I recommend for 90% of beginners. Low-bar position: the barbell is placed lower, resting on the rear deltoids. This requires more forward lean of the torso and engages the posterior chain (glutes and hamstrings) to a greater extent. The grip should be symmetrical and narrow enough to create a "shelf" with the back muscles for the barbell to rest on stably. The goal is for the elbows to point down or slightly back, not straight back, which helps maintain a tight back.
Step-by-Step Execution: Descent (Eccentric) and Ascent (Concentric)
Once you've positioned the barbell and your feet, the execution consists of several key phases. First, take a deep breath "into your belly" (a technique called bracing, which I'll discuss in detail). Unrack the barbell by standing up fully, and take 1-2 steps back. Your feet are in your chosen stance, and your gaze is forward.
The Descent (Eccentric Phase): The movement begins simultaneously by pushing your hips back and bending your knees, as if sitting down on a chair slightly behind you. I often see people initiating the movement only with their knees, which sends them forward and unnecessarily loads the joints. Your chest should remain "open" and upright, and your lower back should maintain its natural curve. Control the descent – it should take about 2-3 seconds. Don't just "drop" down. The goal is to descend until your hips are below your knees.
The Ascent (Concentric Phase): When you reach your desired depth, the upward movement should be explosive yet controlled. Think of "pushing the ground away" with your entire foot. The focus is on standing up, leading with your chest and hips simultaneously. A common mistake is for the hips to shoot up faster than the shoulders, turning the second half of the movement into a "good morning" and brutally loading the lower back. Exhale forcefully towards the end of the movement or after you've fully stood up. When doing working sets, for example, 4 sets of 6-8 repetitions with a weight around 75% of your maximum (1RM), each rep should look identical. Rest between 90 and 120 seconds between sets.
Squat Depth: How Deep Should We Actually Go?
The question of depth is one of the most debated in strength circles. The short answer is: you should squat as deep as possible while maintaining proper form and a neutral spine. For most people, this means reaching what's called parallel or slightly below. "Parallel" is defined as the point where the hip crease is level with the top of the knee. Going below this point (ass to grass, ATG) offers additional benefits.
Why is depth important? Studies and practice show that a full range of motion activates the glutes and hamstrings to a much greater extent. Partial reps, where you only go down 45-60 degrees, primarily load the quads and are often the result of "ego lifting" – using too much weight that cannot be controlled through the full range. A full-depth squat with 100 kg is much more effective and safer for muscle growth and strength than a "quarter squat" with 140 kg.
Of course, there are exceptions. Individual anatomy (femur length, ankle and hip mobility) can limit depth. If you feel your hips "tucking" under you at the bottom and your lower back rounding (a phenomenon called "butt wink"), it's a sign you've exceeded your active mobility limits. In such cases, work on ankle and hip mobility and squat only to the point just before you lose neutral spinal position.
🔬 From Practice
I had a client, Peter, who was stuck at an 80 kg squat for 5 reps for three months. He complained of mild lower back pain after training. When I watched him, I saw he was just "tightening his abs." We spent two weeks reducing the weight by 30% (to about 55-60 kg) and focused solely on breathing and creating intra-abdominal pressure (bracing). I explained it to him as "trying to fill your belt with air, even when you're not wearing a belt." The result? In the third week, he hit 85 kg for 5 reps with no lower back pain. Sometimes the breakthrough isn't in the leg muscles, but in the core.
Bracing: The True Secret to a Stable and Powerful Squat
If there's one element that separates beginners from advanced lifters, it's the ability to properly brace the core. Most coaches say "brace your core," but this is vague and often misinterpreted as "suck in your gut." Core bracing is entirely different. It's the process of creating 360-degree pressure within the abdominal cavity, turning your torso into a rigid, unmovable cylinder. This cylinder stabilizes the spine and protects it from load, allowing you to lift heavy and safely.
How do you do it? Before you start your descent, take a deep breath, but not into your chest, rather "into your belly." Imagine you want to expand your waistline in all directions – forward, sideways, and backward. Then, tense your abdominal muscles as if you're expecting a punch. You should feel tension all around your midsection. This pressure (intra-abdominal pressure) is what keeps your spine in a safe position under load. You hold this breath throughout the descent and into the beginning of the ascent. You exhale forcefully only after you've passed the sticking point or are fully upright.
Practice this technique even without weight. Place your hands on your waist and try to push them outward as you inhale and brace. It might feel strange at first, even make you dizzy, but with practice, it becomes automatic. Without proper core bracing, your spine takes the entire load, which is a recipe for disc herniation with heavier weights.
Back Squat vs. Front Squat: Which Variation is for You?
The back squat is the more popular variation, but the front squat has its own indispensable advantages. The choice between the two depends on your goals, anatomical peculiarities, and mobility level.
The Back Squat allows for the use of significantly more weight, as the center of gravity is closer to the hips, and it more actively engages the entire posterior chain (glutes, hamstrings, erector spinae). It's the "king" for building overall strength and mass. The low-bar variation is preferred in powerlifting precisely because of the mechanical advantage and the ability to lift maximum weight.
The Front Squat, on the other hand, forces the torso into a much more upright position. If you lean forward, you'll simply drop the bar. This upright position intensely loads the quadriceps and requires immense strength from the core and upper back to maintain the position. It's a fantastic exercise for people who want to emphasize their quads, as well as for improving posture. The main challenge here is mobility – it requires good flexibility in the wrists, shoulders, and thoracic spine to hold the bar in the so-called "clean" grip. If this is difficult, straps or a "bodybuilder" grip with crossed arms can be used.
| Parameter | Back Squat | Front Squat |
|---|---|---|
| Muscle Focus | Overall lower body development, emphasis on the posterior chain (glutes, hamstrings). | Emphasis on quads, strong loading of the core and upper back. |
| Weight Potential | High. You can typically squat 15-25% more weight than in a front squat. | Lower. The limiting factor is torso strength and the ability to hold the bar. |
| Torso Position | More forward lean, especially in the low-bar position. | Much more upright position. |
| Spinal Load | Greater compressive and shear load on the lumbar spine. | Less load on the lumbar spine, but greater demand on the thoracic spine. |
| Mobility Requirements | Requires good hip and ankle mobility. | Requires excellent wrist, shoulder, thoracic spine, and ankle mobility. |
⚠️ Common Mistakes
- Knees caving inward (Valgus collapse): This is the most common and dangerous mistake. It signals weak glutes (especially the medius muscle). Think of "spreading the floor" with your feet to keep your knees aligned with your toes.
- Ego squatting (partial reps): Using too much weight that doesn't allow you to reach at least parallel. This reduces the exercise's effectiveness and increases injury risk.
- "Butt wink" (lumbar rounding): Loss of neutral spine position at the bottom. The cause is usually lack of ankle or hip mobility. Work on mobility and reduce depth until the problem is resolved.
- Heels lifting off the ground: This shifts weight forward onto the toes and loads the knees. The cause is usually poor ankle mobility or an incorrect movement pattern. Placing small plates under the heels is a temporary fix but doesn't address the root cause.
1. Do I need a weightlifting belt when squatting?
For beginners and intermediates who are not lifting above 85% of their maximum (1RM), a belt is not necessary and can even hinder learning proper core bracing. A belt is a tool for advanced athletes to help them increase intra-abdominal pressure during maximal attempts. Learn to create pressure without a belt before considering using one.
2. What are the best shoes for squatting?
Avoid running shoes with soft, unstable soles. They "absorb" the force you're trying to generate. The best choice is shoes with a hard, flat sole (like Converse/Vans style sneakers) or specialized weightlifting shoes. The latter have a raised heel, which helps achieve depth more easily for people with limited ankle mobility.
3. Is squatting bad for my knees?
No, squatting with proper technique is not bad for the knees. On the contrary, it strengthens the muscles and connective tissue around the joint, making it more stable. What is bad for the knees is squatting with poor technique – knees caving inward, excessive weight, bouncing at the bottom, etc.
4. My lower back hurts when I squat. What's the cause?
Lower back pain is most often a sign of a technical error. The most likely causes are: lack of proper core bracing, "butt wink" (lumbar rounding) at the bottom, or excessive forward lean where the movement turns into a "good morning." Reduce the weight, film yourself from the side, and analyze your technique, or consult a qualified coach.
5. How often should I include squats in my program?
It depends on your goals, training volume, and recovery. For most people training for general strength and hypertrophy, squatting 1 to 2 times per week is sufficient. Strength athletes and powerlifters may squat 2-3 times per week, but with different variations and intensities (e.g., one heavy day, one volume day, and one lighter variation day like front squats).
See more in the fitness guides of Sport Zona Academy.
📚 Scientific Sources
- Kinematics and kinetics of the squat and their application to exercise execution (Schoenfeld BJ., 2010)
- A biomechanical comparison of back and front squats in healthy trained individuals (Gullett JC, et al., 2009)
- Acute hormonal response to free weight and machine based strength/power exercise (Shaner AA, et al., 2014)
- The effect of squatting depth and barbell position on the relative muscular effort during the squat (Bryanton MA, et al., 2012)
🔬 Expert Note from Sport Zona
Over the years, I've seen how poor squatting leads to injuries and stalled progress, but also how perfect technique unlocks monstrous potential. Don't rush the weights; invest in the movement first – the difference is huge. Personally, I always bring my clients back to the basics, even after years of training, to refine every detail.
See more in the fitness guides of Sport Zona Academy.
Recommended products


Frequently asked questions
Why is the squat called the 'king of exercises'?
The squat is called this because it is a complex movement that engages multiple muscles simultaneously, especially in the lower body and abdominal area. It stimulates significant metabolic stress and hormonal response, aiding muscle growth and overall body strengthening.
How should I position my feet correctly for a squat?
The optimal position is with feet slightly wider than shoulder-width or hip-width apart, with toes pointing slightly outward (15-30 degrees). This position facilitates reaching greater depth and protects the knees from strain.
What is the difference between a High-bar and a Low-bar squat?
In a High-bar squat, the barbell rests on the trapezius muscles, allowing for a more upright torso and emphasizing the quadriceps. In a Low-bar squat, the barbell is positioned lower, on the rear deltoids, requiring more forward lean and engaging the posterior chain (glutes and hamstrings) more.
What is the role of 'bracing' (stable core) during a squat?
Bracing is key for safety and strength during a squat, as it creates intra-abdominal pressure that maximally protects the spine. This is not just 'tensing the abs,' but controlled breathing and stabilization.